Easy Scone Recipe - Make Tall, Fluffy Scones With Variations
Get bakery-quality scones every time! I shares the precise technique for the rub-in method and maximum steam lift. Fruit, cheese, and lemonade variations included.
Author:Callum FraserNov 15, 20252.8K Shares156.8K Views
Stop Baking Flat Scones: Expert Secrets For A Perfect Texture
If you’ve ever followed a scone recipe perfectly only to pull out flat, dense, and disappointingly tough results, you’ve experienced the single greatest pain point in home baking.
Sconesare deceptively simple; the margin for error is small, but the rewards are huge-a light, tender crumb that melts in your mouth. As a baker dedicated to traditional Scottish methods, I’ve spent two decades perfecting a reliable system.
This isn't just another recipe; this is the Scottish Baker's System - a three-part, science-led framework designed to give you tall, light, bakery-quality scones with far more consistency.
What Are Scones?
To truly master the scone, you must first understand what it is and, crucially, what it is not. A scone is a single-serving, quick breadthat relies entirely on chemical leavening agents (baking powder or soda) and steam, not yeast, for its rapid rise.
It is designed to be made quickly and baked immediately. Understanding this core identity ensures you respect the ingredients' time sensitivity.
Scone Vs. Biscuit Vs Crumpets: The Key Differences
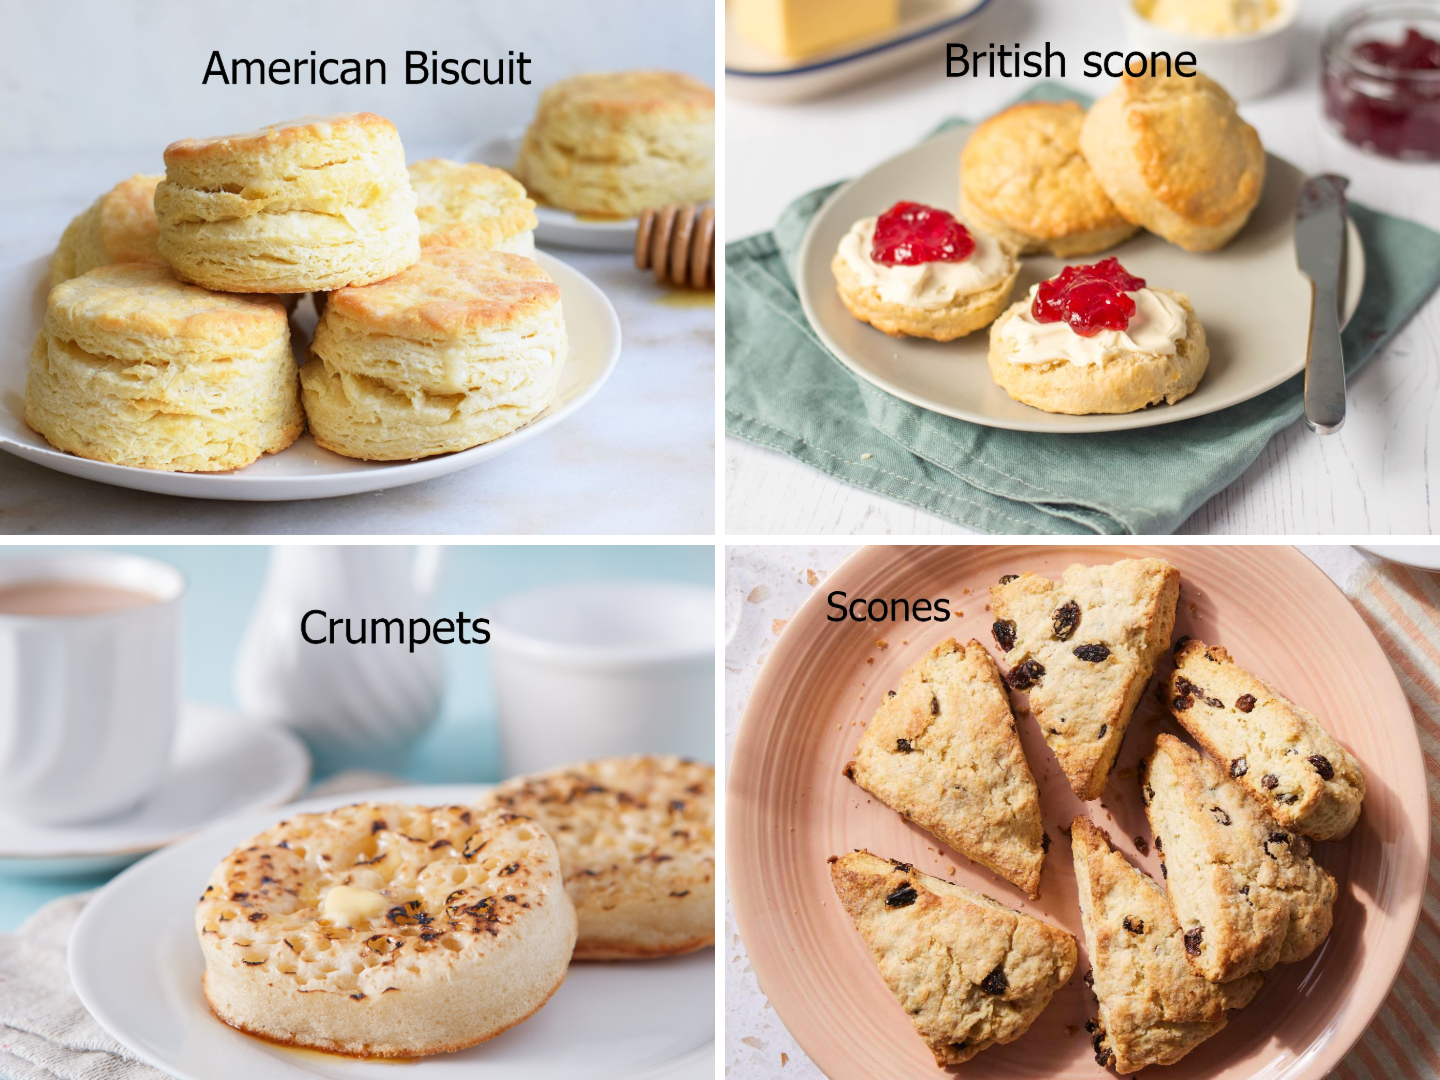
The confusion between the British scone and the American biscuit is common, but their textures and ingredients are distinctly different. While both are quick breads, the British scone is slightly drier, light, and flaky; it often includes egg, butter as the primary fat, and is served lightly sweet with jam and clotted cream.
The American biscuit, on the other hand, is typically savory, uses shortening or lard, and is served with gravy or butter. Our focus here is on achieving the superior rise and crumb of the British-style scone. This understanding informs our ingredient choices to follow.
Crumpets are yeast-raisedand cooked on a griddle in rings, developing a spongy texture riddled with holes. Scones are oven-baked, crumbly rather than spongy, and not full of holes.
The British Vs. The American Scone
While both are quick breads, the classic British scone is slightly richer, often including a binding agent like egg, and features a subtle sweetness. The American biscuit, while similar in structure, focuses on deep layers of fat, lending it a distinctly savory and almost bread-like quality. Choosing the right ingredients is the first step to achieving that desired fluffy crumb.
Best Scone Recipe Ingredients
The single most important decision for a perfect scone happens before the oven is even switched on. You need the right combination of flour, fat, and liquid to create the foundational structure for a massive rise.
The Flour Factor: Self-Raising Vs. All-Purpose (and The Science Of Leavening)
While many easy scone recipes call for self-raising flour, I recommend using plain (all-purpose) flour with a measured amount of baking powder. This gives you full control over flavour and lift. Baking powder combines an acid and a base in one ingredient; when it meets liquid and heat, it releases carbon dioxide, forming the bubbles that raise the dough.
As a good rule of thumb, use about 1–1¼ teaspoons of baking powder per cup (120 g) of plain flour, adjusting slightly only if a specific recipe has been thoroughly tested with more.
Why Cold Butter Is Non-Negotiable: The Science Of Steam Lift
This is the non-negotiable secret to a tall scone. The butter must be very cold, cut into small cubes, or grated, and returned to the freezer for 15 minutes before use. As the cold pieces of butter melt in the hot oven, they release steam.
This trapped steam physically forces the layers of dough apart, providing a massive, instantaneous upward thrust that chemical leavening alone cannot achieve. If your butter is warm, it melts beforethe oven, resulting in a flat, dense scone.
The Role Of Fat & Liquid: Buttermilk, Cream, Or Milk?
For the lightest texture, you need a liquid that brings both fat and gentle acidity. Buttermilkis the gold standard: its acidity helps keep the crumb tender and adds flavour, while baking powder supplies the main leavening.
If you don’t have buttermilk, you can mimic it by mixing whole milk with a little lemon juice and letting it stand for a few minutes before using.
The Sugar & Salt Balance: More Than Just Flavor
Salt is vital for flavor balance and controlling the yeast/leavening. Sugar, while contributing sweetness, also helps the crust brown beautifully (Maillard reaction) and tenderizes the dough by interfering with gluten development. Butter scones benefit from a slightly higher sugar content to balance the richness.
Master Classic Scone Recipe
In this section you’ll get a clear master recipe for classic Scottish/British scones plus visual cues and a troubleshooting guide so you can bake them with confidence.
Basic Scone Recipe Ingredients
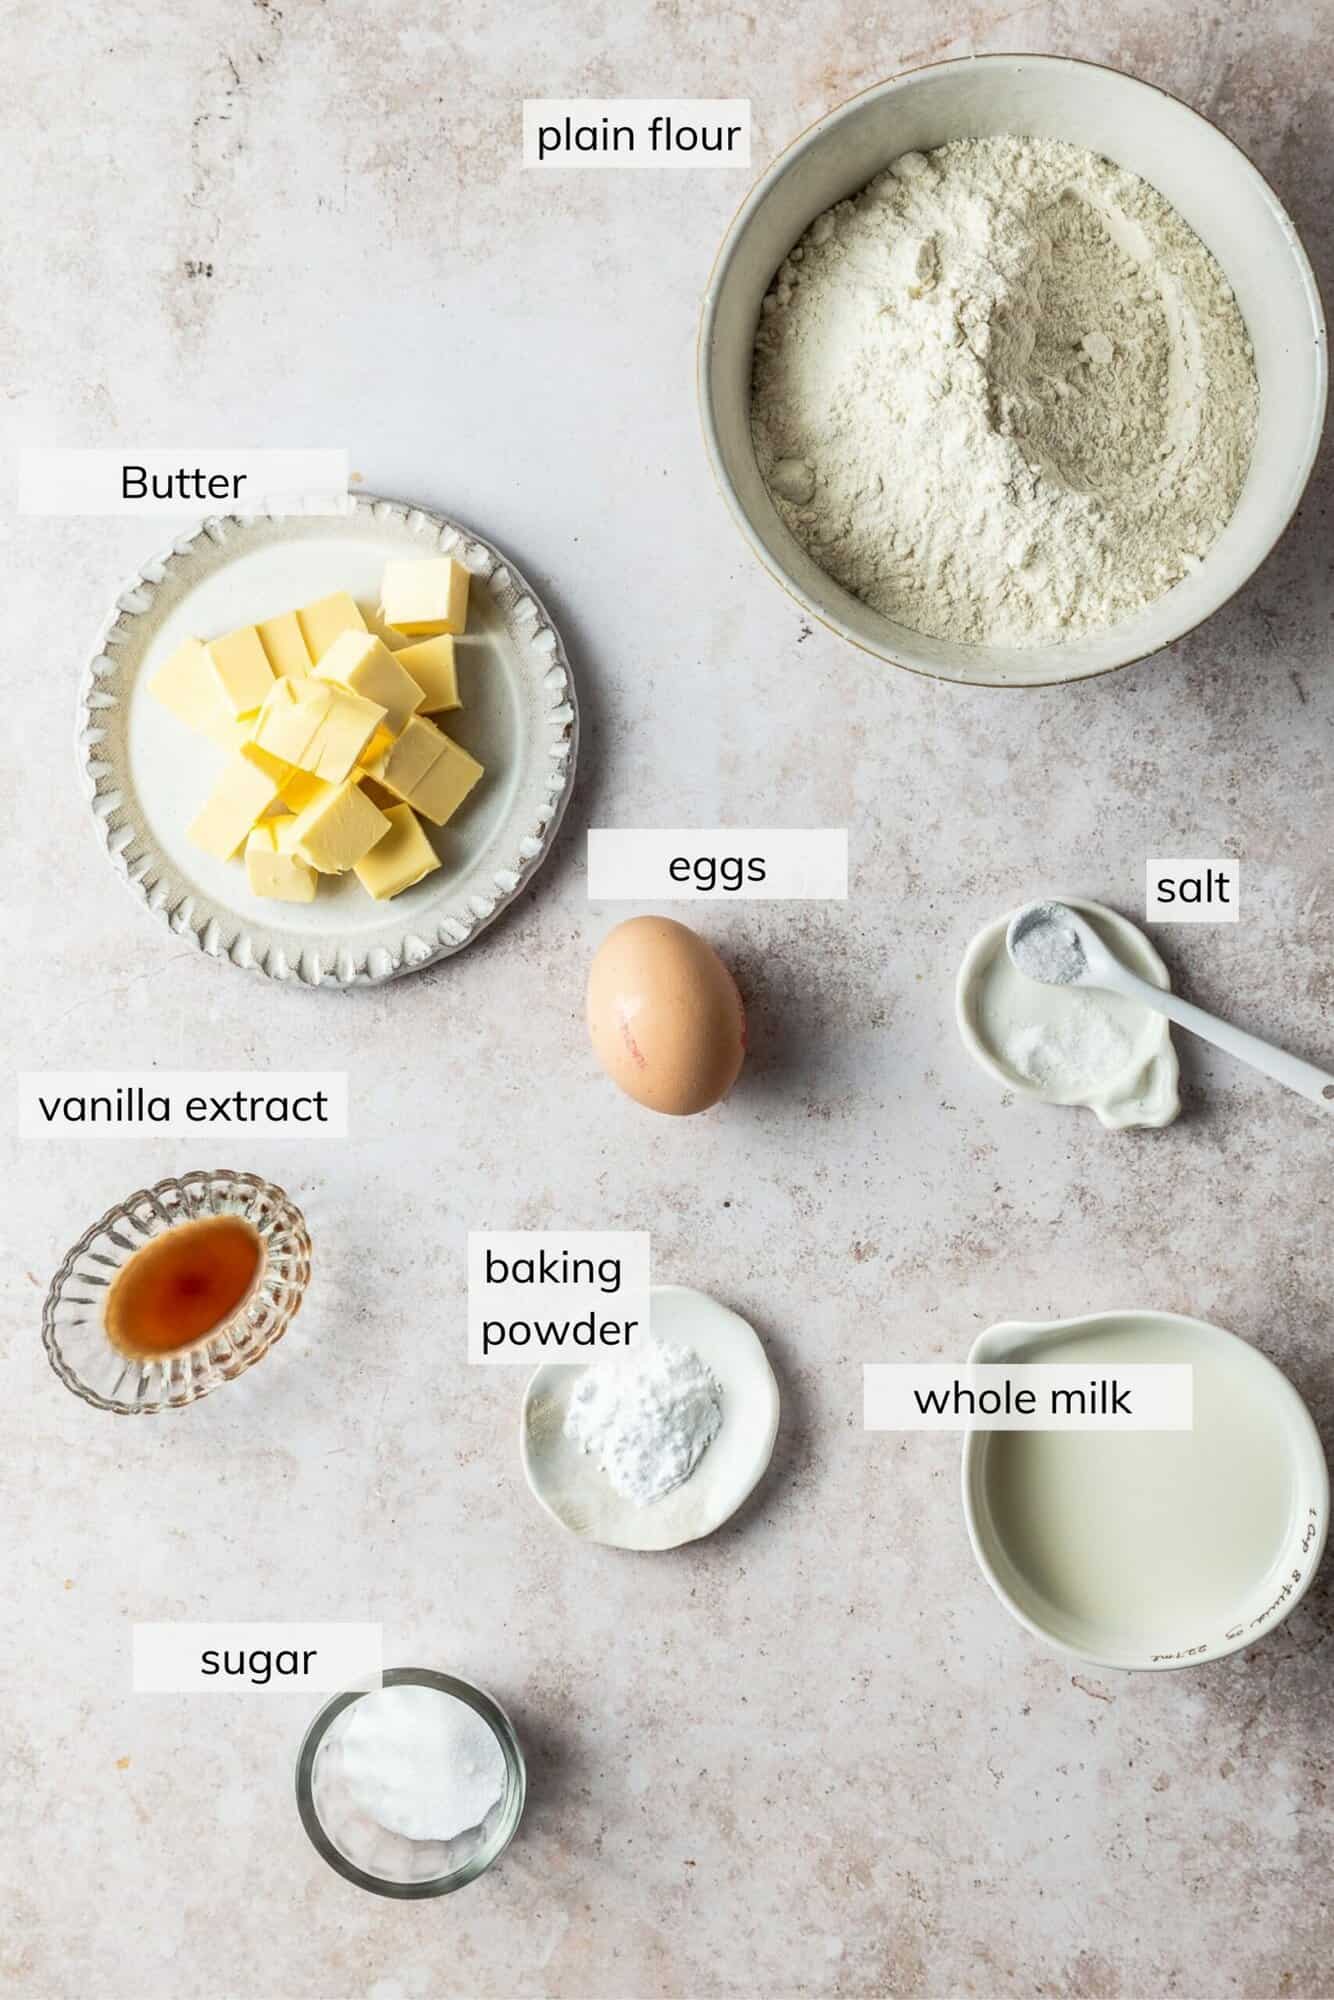
- Plain (All-Purpose) Flour:2 cups (250 g)
- Baking Powder:1 Tbsp (15 g)
- Granulated Sugar:1/4 cup (50 g)
- Salt:1/2 tsp (3 g)
- Unsalted Butter (Cold, Cubed):4 Tbsp (1/4 cup or 57 g)
- Egg (Large, Cold):1
- Buttermilk / Whole milk (Cold):1/2 cup (120 ml)
- Vanilla Extract:1 tsp
This recipe yields 8-10 scones (depending on cutter size). The preparation time is typically 15 minutes, followed by a short bake time of 12-15 minutes at a high oven temperature of 425F (220C).
How To Make Scones: Step-by-Step Method
Follow these sequential steps to ensure optimal results, paying close attention to speed and minimal handling:
1. Prep the Dry Ingredients
Preheat your oven to 425F (220C). Whisk together the flour, baking powder, sugar, and salt in a large, chilled bowl.
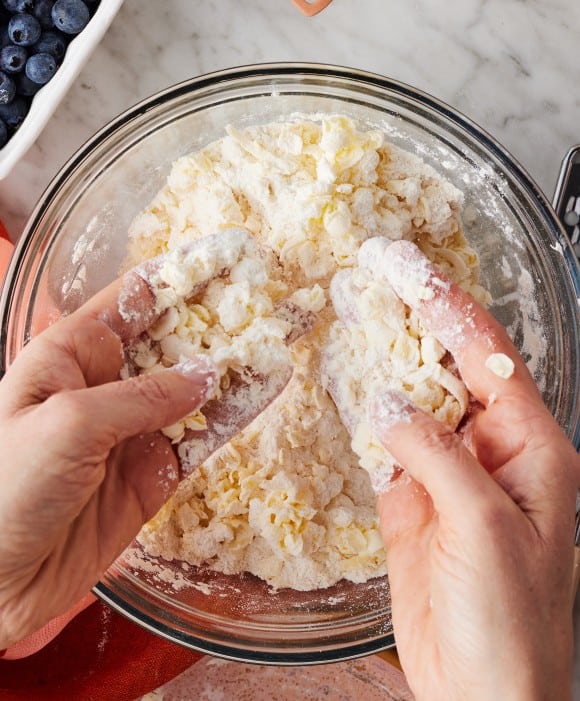
2. Incorporate the Butter
Add the cold butter cubes to the dry ingredients. Use your fingertips to quickly rub the butter into the flour until the mixture resembles coarse breadcrumbs or small peas, avoiding large lumps.
After the butter, add your chosen extra bits and toss them so they're covered in flour. In a medium bowl, mix the wet ingredients that are left. Pour them into the flour mix. Stir with a spoon until the dough is rough.
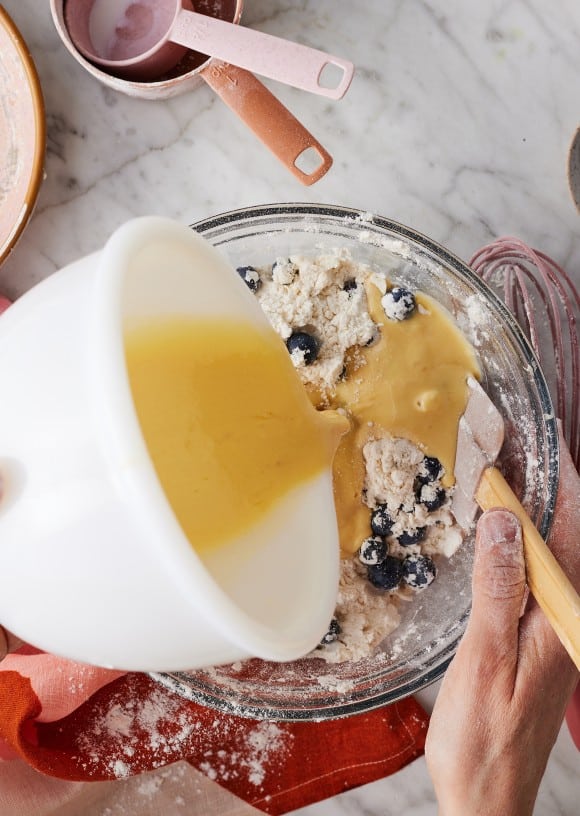
3. Mix the Liquid
Whisk the cold egg and buttermilk together in a small bowl. Create a well in the center of the dry ingredients and pour in the liquid all at once.
4. Form the Dough
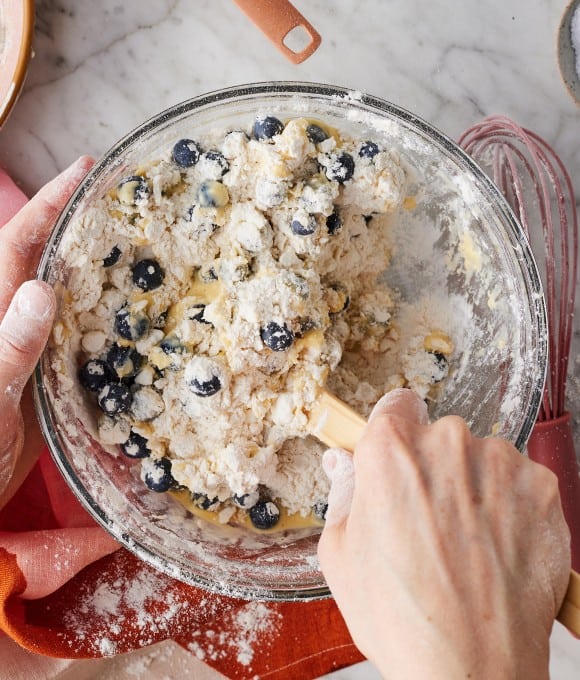
Use a spatula or wooden spoon to quickly bring the ingredients together until a shaggy, soft dough forms. Do not overmix.
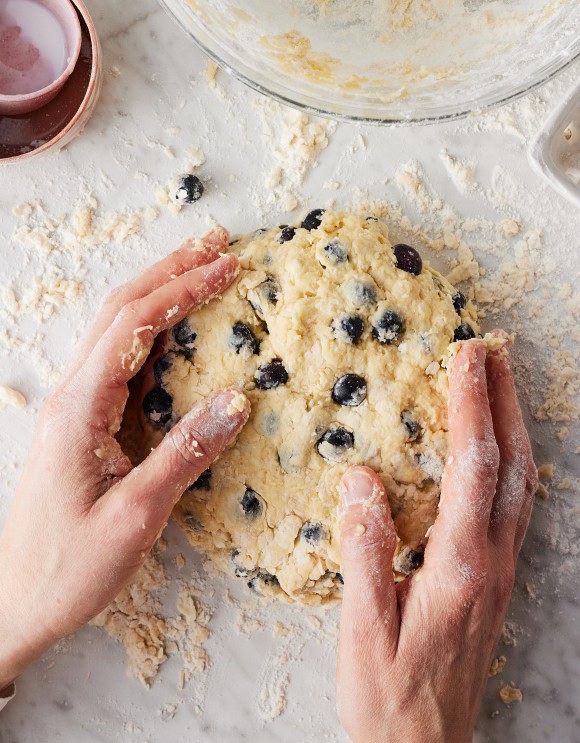
5. Knead Lightly
Turn the dough onto a lightly floured surface. Gently fold the dough over itself 8 to 10 times-just enough to form a cohesive mass. Pat the dough to a thickness of about 1 inch (2.5 cm).
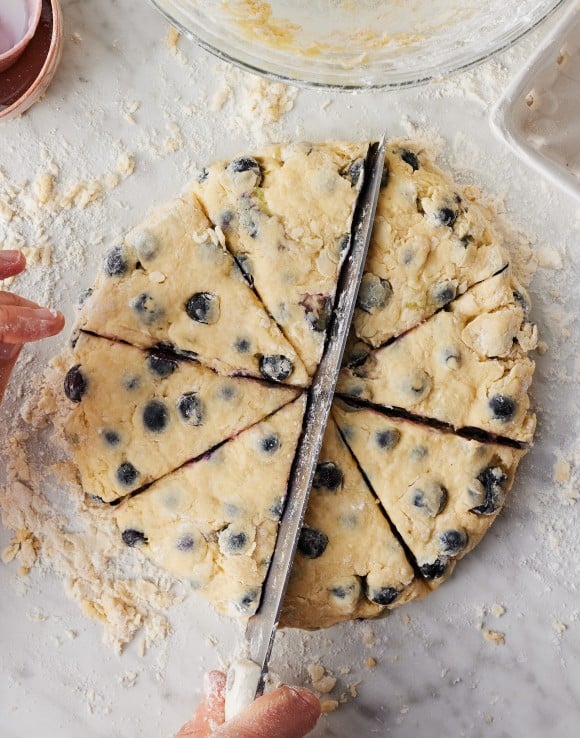
6. Cut the Scones
Dip your metal scone cutter into flour and press straight down into the dough. Do not twist. Re-flour the cutter after each use. Gather the scraps, pat them down gently (minimal handling!), and cut the remaining scones.
7. Bake
Place the cut scones onto a lined baking sheet. Brush only the tops of the scones with an egg wash (egg mixed with a splash of milk). Bake for 12-15 minutes, until the tops are golden brown and the interior is fully cooked.
8. Cool and Serve
Transfer the finished scones to a cooling rack. Serve warm with butter, jam, and clotted cream.
The Perfect Scone Technique
Baking scones is a race against time; the enemy is warmth and over-handling. This technique ensures maximum lift.
The Scottish Baker's Checklist For Perfect Scones
- DO keep all ingredients (including the mixing bowl) as cold as possible.
- DO use a large mixing bowl to minimize handling the dough.
- DO use only your fingertips to rub in the fat, keeping your warm palms away from the dough.
- DO knead the dough a maximum of 8-10 times, just until it comes together.
- DO use a very sharp, flour-dusted straight-edge cutter.
- DON'T overmix or overwork the dough; this develops tough gluten.
- DON'T let the dough get warm; work quickly and place it back in the fridge if needed.
- DON'T twist the cutter; this seals the edges and prevents rising.
- DON'T let the egg wash drip down the sides of the scone.
The Rub-In Method Mastered (The Secret To Coarse Crumbs)
The key to a light scone is ensuring the fat is fully encased in flour. Using your fingertips, quickly rub the cold butter into the flour until the mixture resembles coarse, floury sand or small peas. The larger the pieces of butter, the more steam they will create. Stop immediately when no large lumps remain.
Minimal Kneading, Maximum Fluff: How To Handle Scone Dough
Once the liquid is added, mix it only until the dough justcomes together. Turn the sticky dough onto a lightly floured surface. Using a very light touch, fold it over itself only a few times-think of the dough as a sponge you shouldn't squeeze. Overworking the dough develops gluten, which makes the texture tough and flat rather than soft and airy.
The Scone Cutter Rule: Press, Don't Twist (and Why It Matters)
To bake tall scones, you need clean, open-pored edges. Use a sharp, straight-edged scone cutter dusted with flour. Push straight down, hard, and pull straight up. Never twist the cutter. Twisting seals the edges of the dough, effectively gluing the layers together and preventing the steam from pushing the scone up evenly.
The Finishing Touch: Perfect Egg Wash For A Golden Top
For a beautiful golden top, use a simple wash of egg mixed with a splash of milk or cream. Brush only the tops of the cut scones-avoiding the sides completely. If the wash drips down the sides, it will cement the layers together, guaranteeing a flat, lopsided scone.
Watch The Classic Scone Recipe
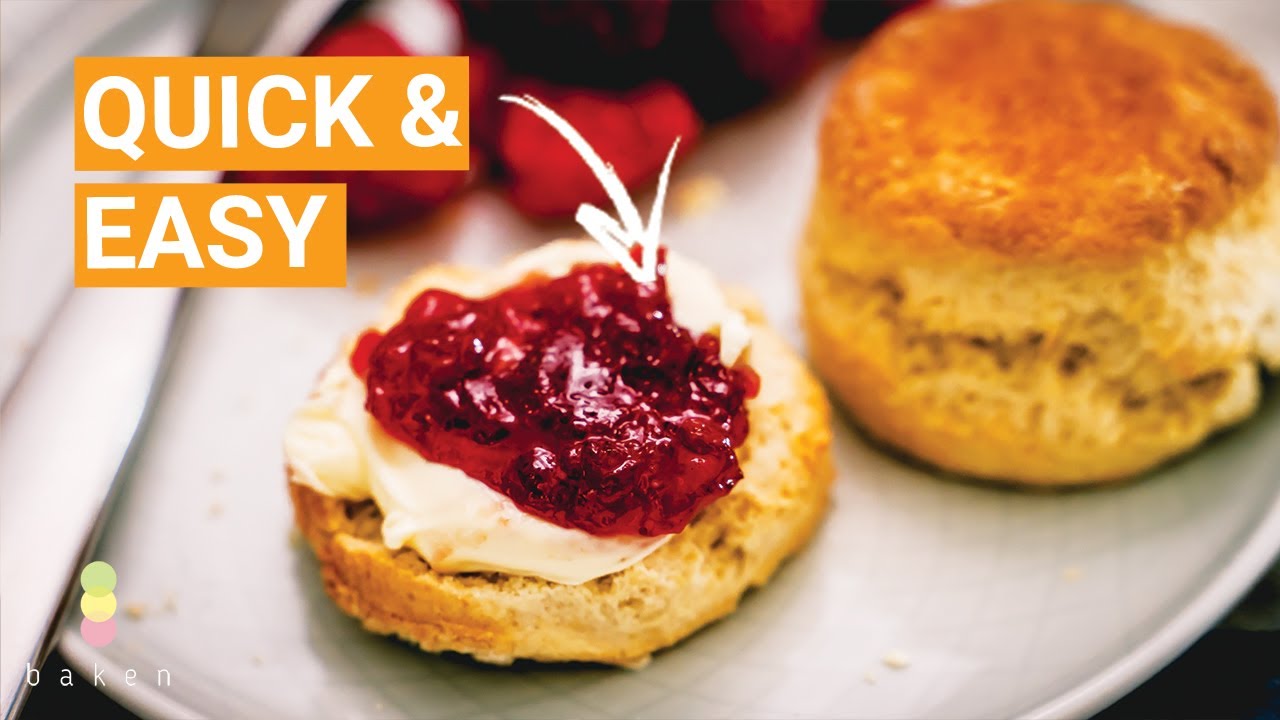
The Classic Scone Recipe!
Expert Troubleshooting: Common Scone Problems Solved
In my experience, almost every scone failure can be traced back to one of three issues. Use this quick guide to fixing future attempts.
- Flat, Dense Scones:This is primarily because the butter was too warm and the steam lift failed. The solution is to ensure the butter is frozen/very cold and you work faster; always chill the dough before baking.
- Dry, Crumbly Texture:This happens due to too much flour, or not enough liquid. Measure the flour accurately (preferably by weight) and add the liquid one tablespoon at a time until the dough is soft and slightly sticky.
- Tough, Hard Scones:This is a classic sign of overworked dough, meaning too much gluten developed. Mix the liquid in gently and knead the dough for no more than 8-10 light folds.
- Lopsided Rise:This is usually caused by twisting the cutter or allowing the egg wash to drip down the side. The remedy is simple: push the cutter straight down and up, and brush the wash only on the top surface.
Why Your Scones Are Flat And Dense (Cause & Solution)
If your scones are flat, the butter likely melted before the oven's heat could convert it into steam. The other major cause is low oven temperature. Bake at 425°F (220°C)to encourage a strong, immediate lift. If the oven is cooler than this, the dough tends to spread out before the structure has time to set.
Why Your Scones Are Dry And Crumbly (Cause & Solution)
Dry, overly crumbly scones are usually the result of excessive flour or insufficient liquid. It's a common beginner mistake to add too much flour when dusting the surface or rolling. Always use a minimal dusting and know that a perfect scone dough should feel slightly sticky and soft before baking.
Avoiding The "Gluten Glue": How To Prevent Tough Scones
Gluten is a necessary protein, but it becomes "tough" when over-developed through excessive handling or kneading. The purpose of fat (butter) in the dough is to coat the flour proteins and inhibit excessive gluten formation. The key takeaway: mix only until the dough barely clings together.
Best Scone Recipes: Popular Scone Variations & Styles
This part helps you adapt the master dough into fruit, cheese, lemonade, and American-style scones so you can match any occasion or craving.
Classic Fruit Scones (Currants, Raisins, Mixed Fruit)
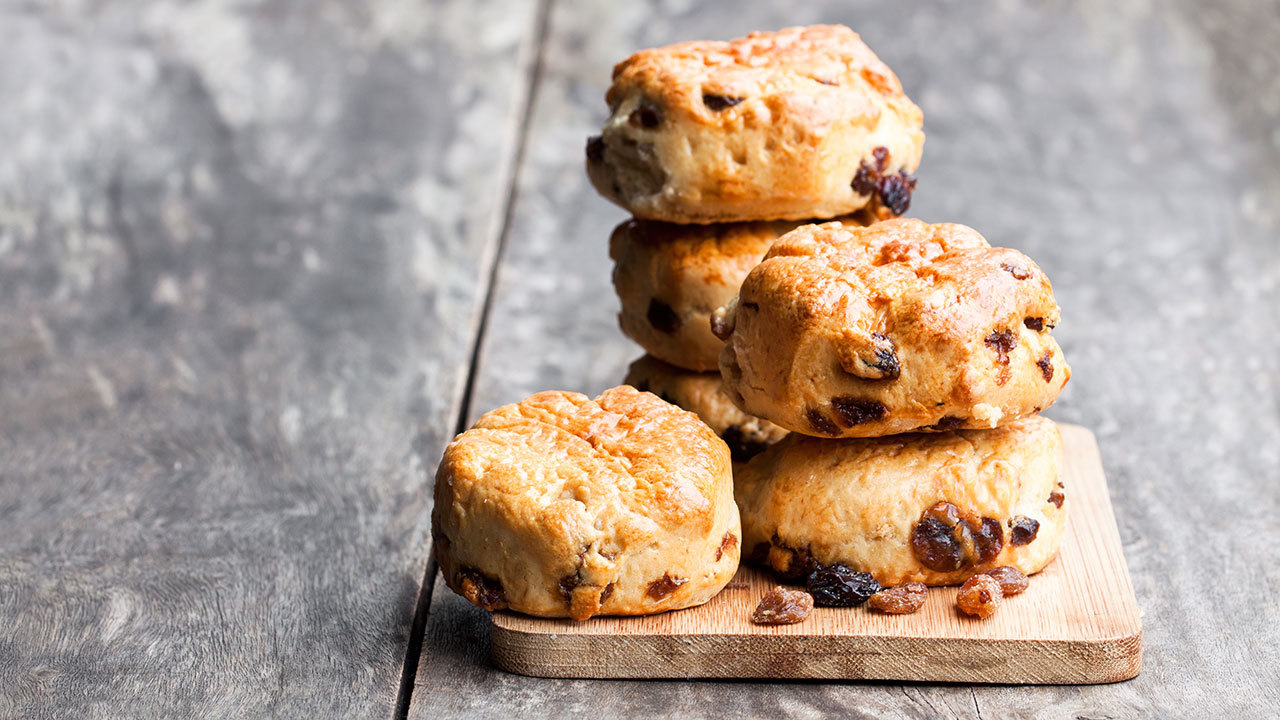
Fruit scones are the backbone of British and Scottish cream teas. They use the same master dough with dried fruit folded through.
Guidelines:
- Add 75–100 g (½–⅔ cup)of currants, raisins, or mixed dried fruit per batch.
- Toss the fruit in a spoonful of flour before folding it into the dough to help distribute it.
- If using very dry fruit, a quick soak in hot tea or juice (then patting dry) can prevent it from stealing moisture from the crumb.
Fruit scones are ideal for afternoon tea trays and travelwell, making them a reliable option when you want something classic.
Cheese & Savoury Scones (Cheddar, Herbs, Parmesan)

Cheese sconesturn the same principles savoury and are perfect with soup or as a snack. For a step-by-step version, see my scottish cheese scones recipe. Tesco and other UK sources show how a generous amount of cheese and yoghurt or milk create soft, savoury scones.
Tips:
- Use 80–100 g (¾–1 cup)of strong Cheddar or similar per batch.
- Reduce or omit sugar; savoury scones don’t need much sweetness.
- Add herbs (chives, thyme, rosemary) or spices (paprika, mustard powder) in the dry mix.
- Be cautious with salt; cheese already contributes a lot.
Cheese scones should still be light and tender, not dense bricks, so treat the dough as gently as you would a sweet version.
Lemonade & 4-Ingredient Scones (Ultra Quick Method)
Lemonade scones are famous in Australia and the UK for being extremely fast: self-raising flour, double cream, lemonade (fizzy soft drink), and sometimes a pinch of salt.
Why they work:
- Self-raising flour and the carbonation in lemonade give lift.
- Cream replaces butter and milk, simplifying the recipe.
The 4-Ingredient Scone Secret (And Why It Works)
Many recipes for easy scones use just four ingredients: self-raising flour, cream, sugar, and milk/lemonade. This works because the self-raising flour contains the necessary leavening, and the cream is rich in fat and liquid, eliminating the need for separate butter. This technique, while fast, yields a slightly heavier texture but is highly reliable.
American-Style Café Scones (Chunky & Glazed)
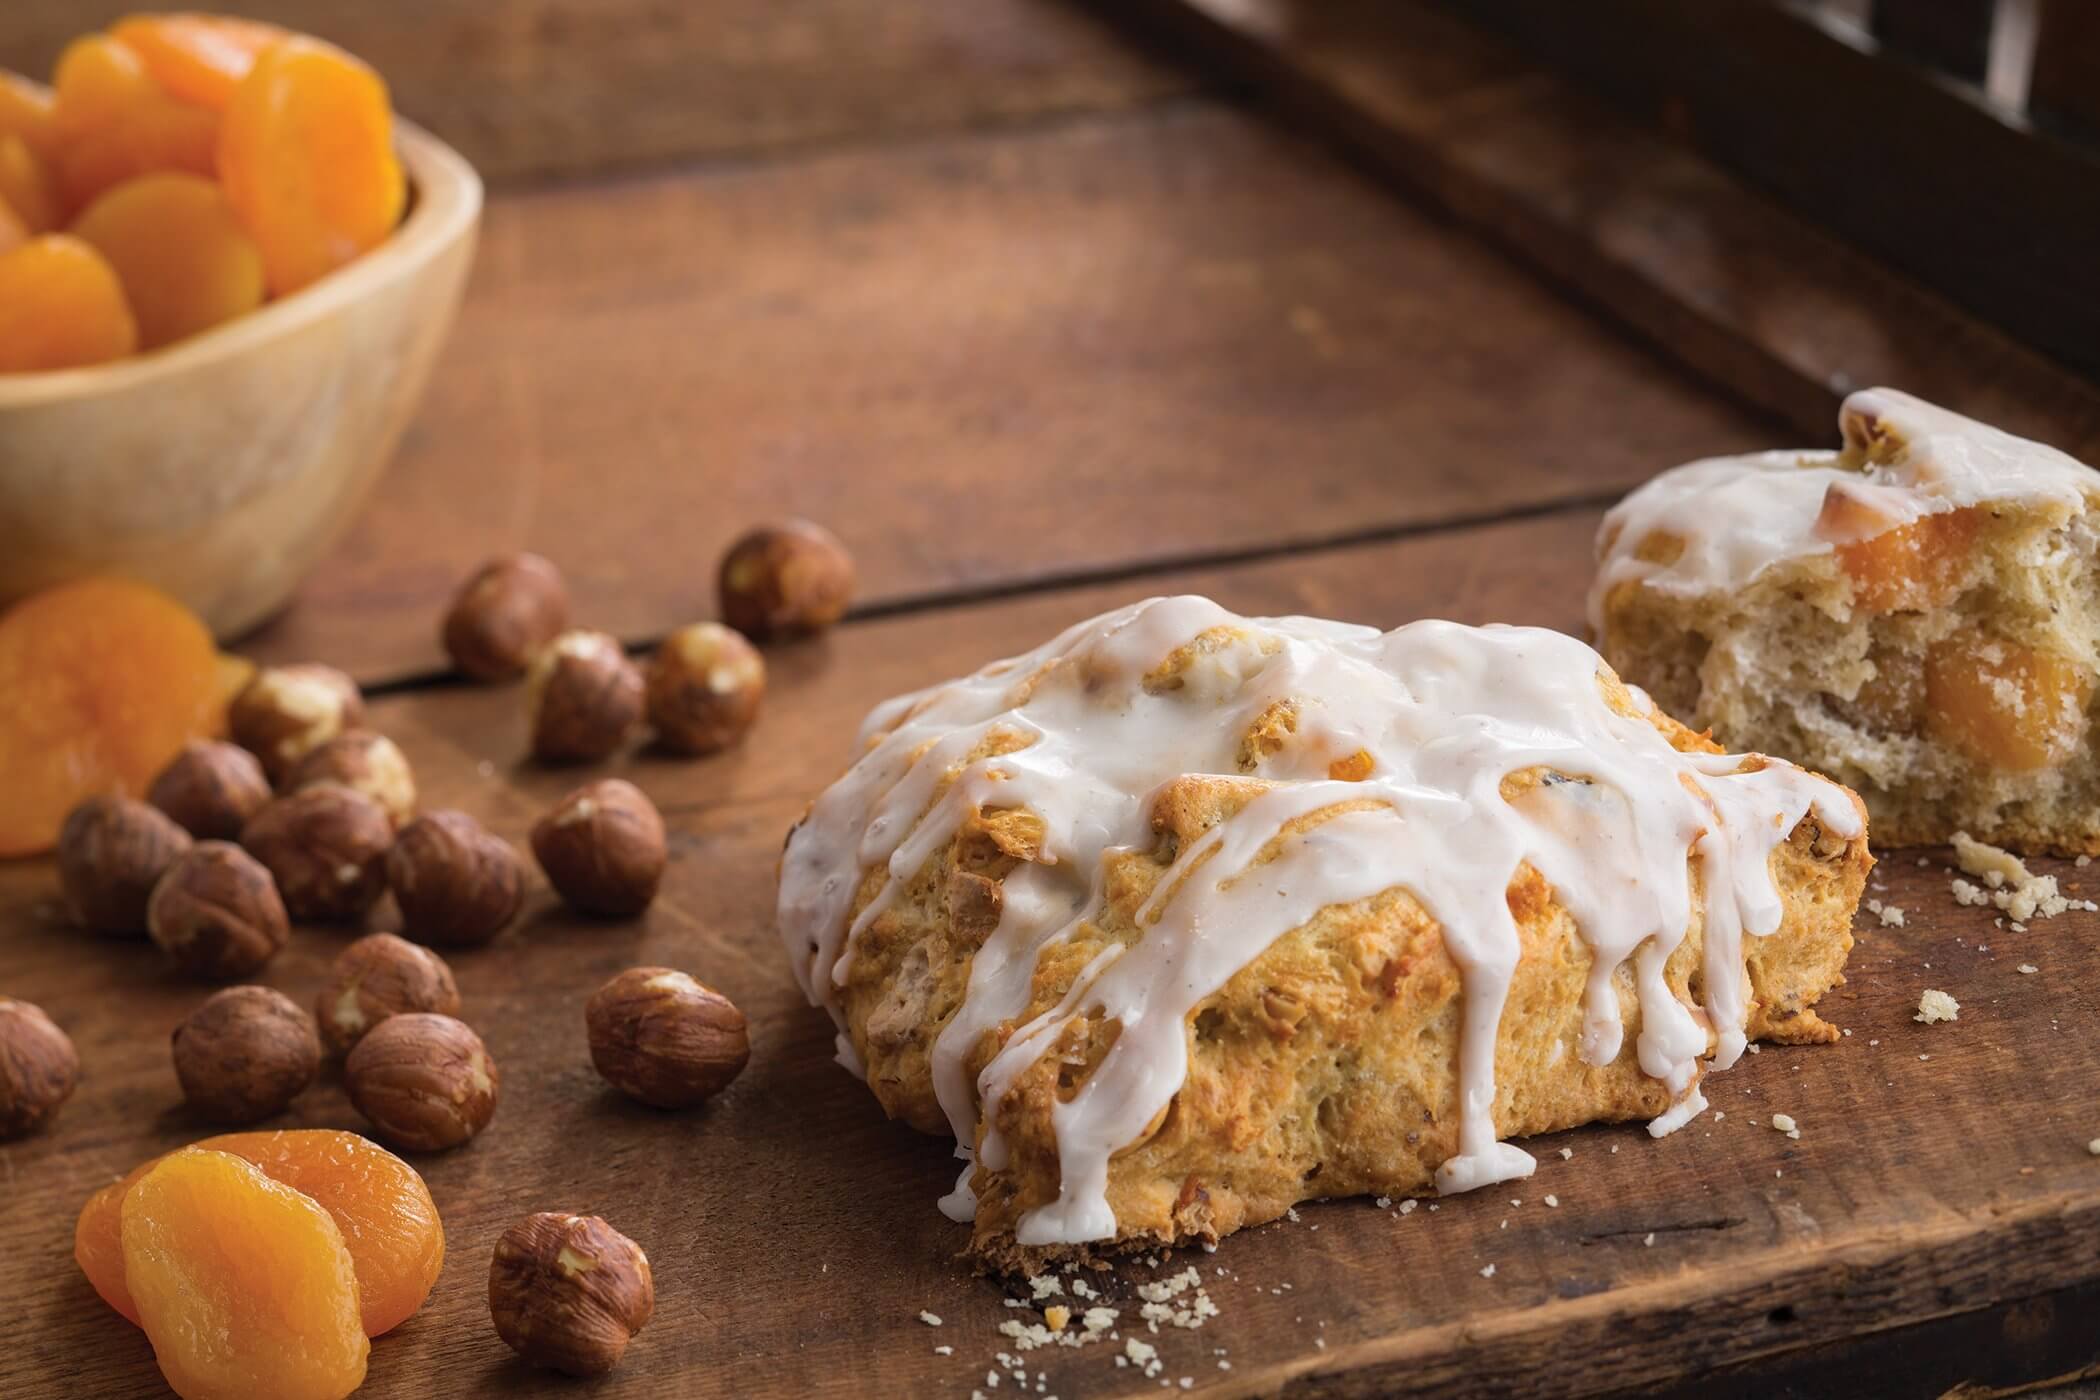
For those who love coffee-shop scones, the master recipe can be shifted towards American-style wedges.
Adjustments:
- Increase sugar for a sweeter crumb.
- Add more butter or cream for richness.
- Shape dough into a disc and cut into wedges.
- Add mix-ins like chocolate chips, nuts, or flavoured glazes.
These are more like indulgent treatsthan simple tea scones but follow the same rules: cold fat, gentle handling, hot oven.
Scottish Specialities - Drop, Girdle & Tattie Scones (Brief Overview)
Scottish cooking features several related scone-like recipes:
- Drop/girdle scones:Thick, mini pancake-like scones cooked on a hot griddle or girdle.
- Tattie scones:Thin potato sconesoften served with a cooked breakfast.
These deserve dedicated recipes of their own; think of them as cousins to oven-baked scones, using similar simple ingredients but different techniques.
Simple Adaptations - Wholemeal, Dairy-Free, And Vegan Notes
If you need adaptations:
- Wholemeal:Swap up to half the white flour for wholemeal; add a splash more milk if the dough feels dry.
- Dairy-free:Use a good dairy-free block “butter” and plant milk; results are slightly different but can still be tender.
- Vegan:Combine dairy-free butter, plant milk, and no egg; scones will be a bit less rich but still enjoyable.
Mini Scone Style Finder
Use this quick guide to choose your starting point:
- Want traditional cream-tea? → Classic fruit or plain Scottish/British scones.
- Need something very fast with few ingredients? → Lemonade or 4-ingredient scones.
- Craving a savoury snack? → Cheese and herb scones.
- After a coffee-shop style treat? → Rich, American-style wedges with glaze.
Section takeaway:Once you see the master dough as a base, it’s easy to plug in fruits, cheese, lemonade, or glazes and create scone styles that suit every occasion.
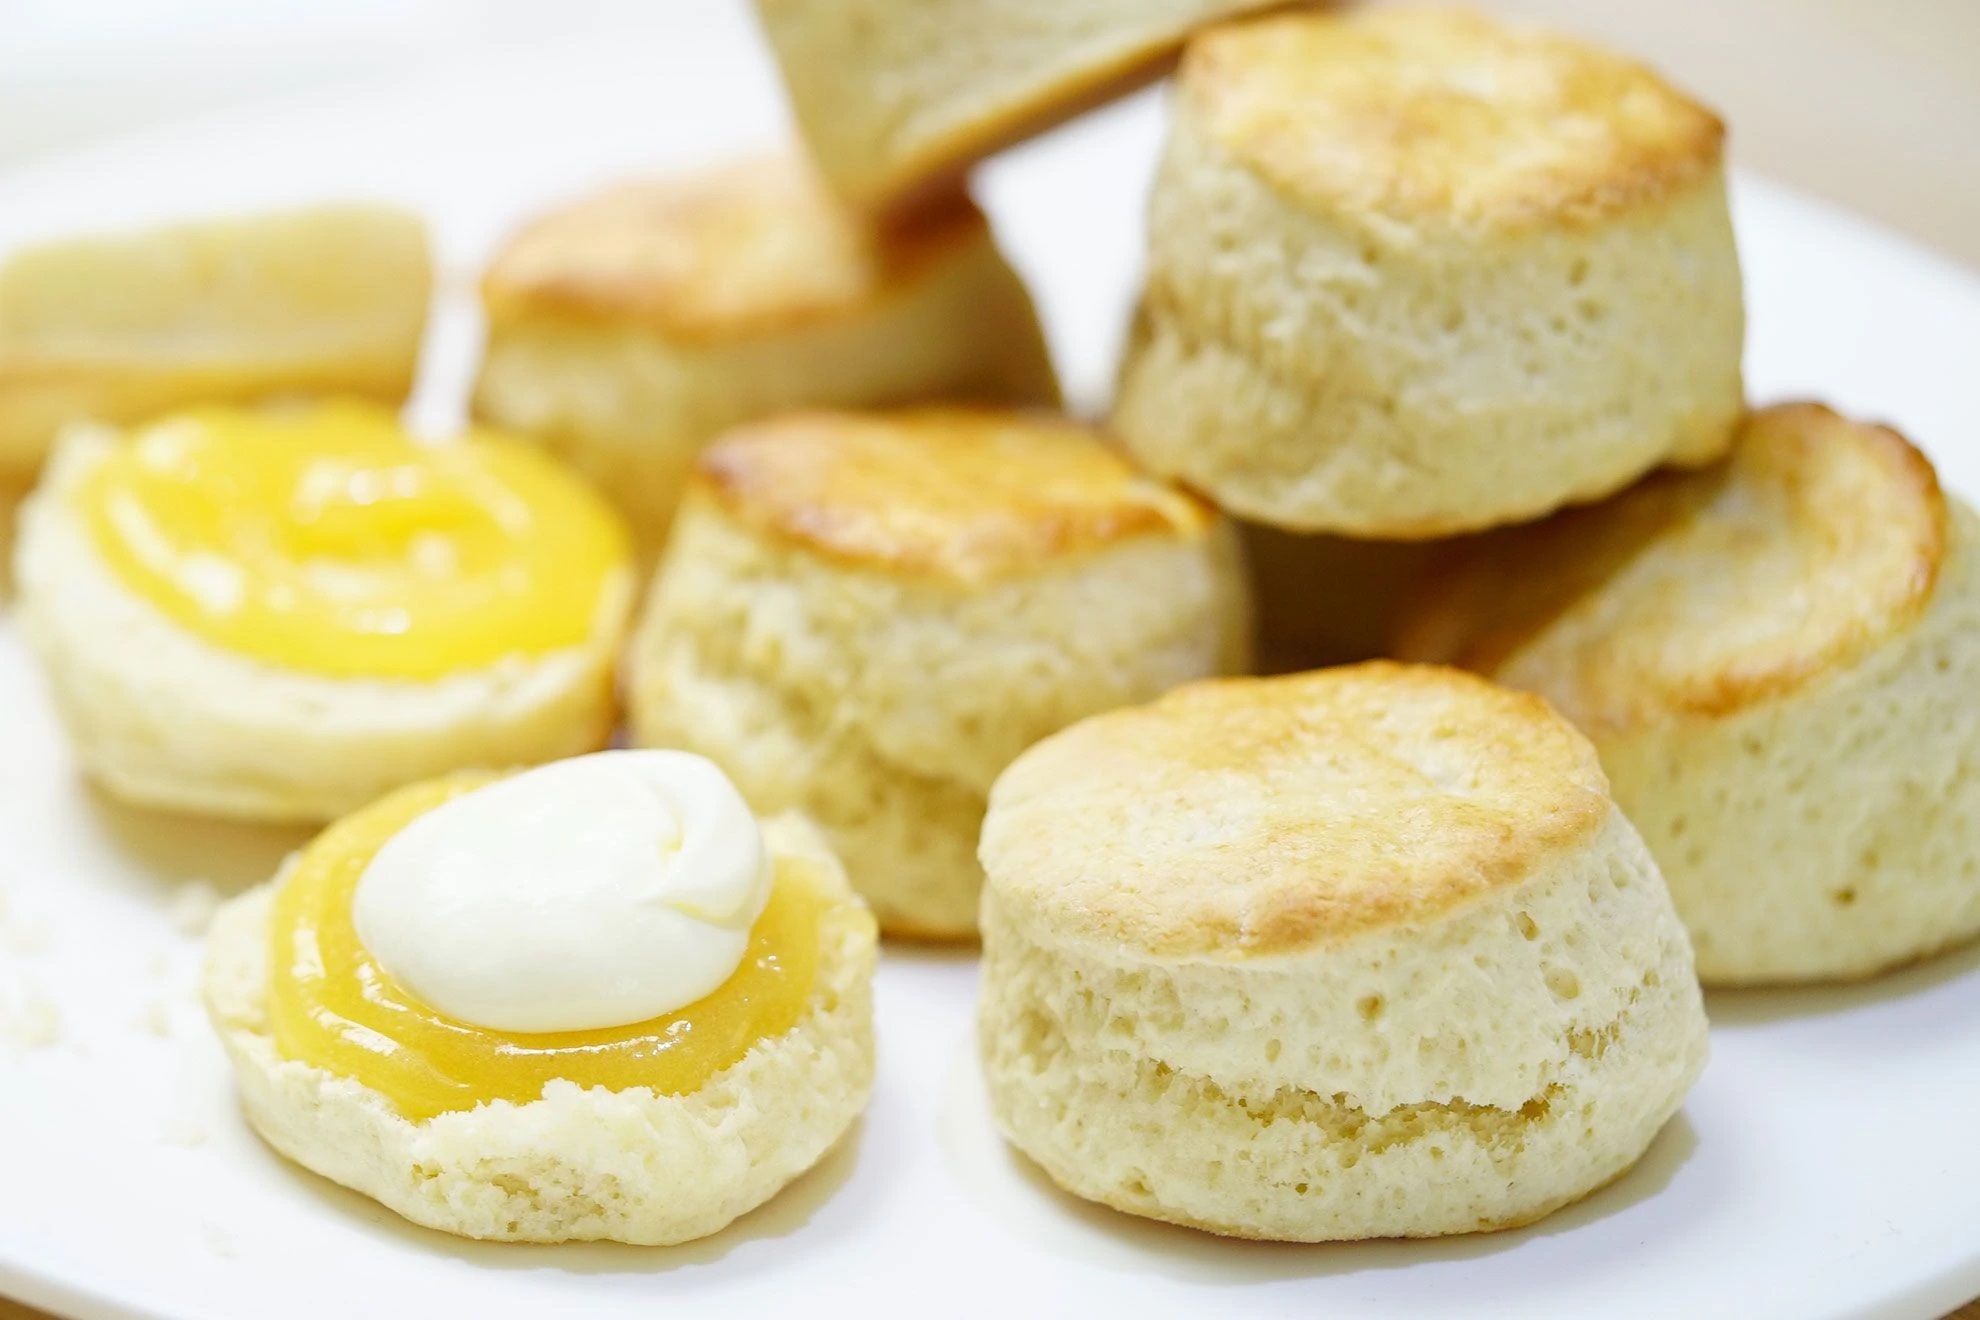
Serving & Storage: The Perfect Accompaniments
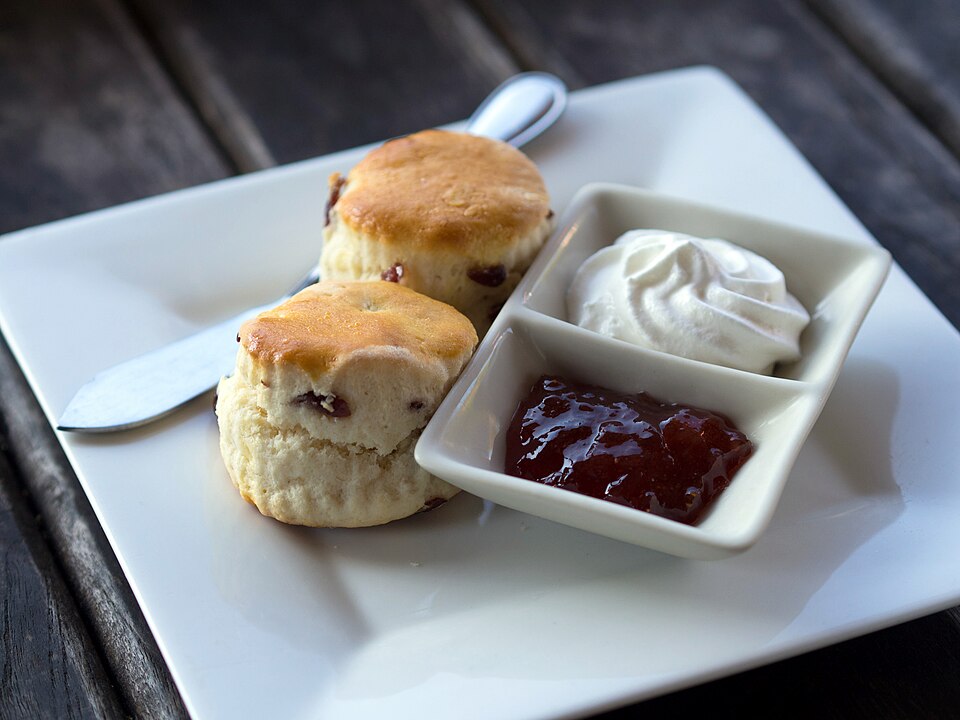
Clotted Cream, Jam, And The Great Debate (Cornish Vs. Devon)
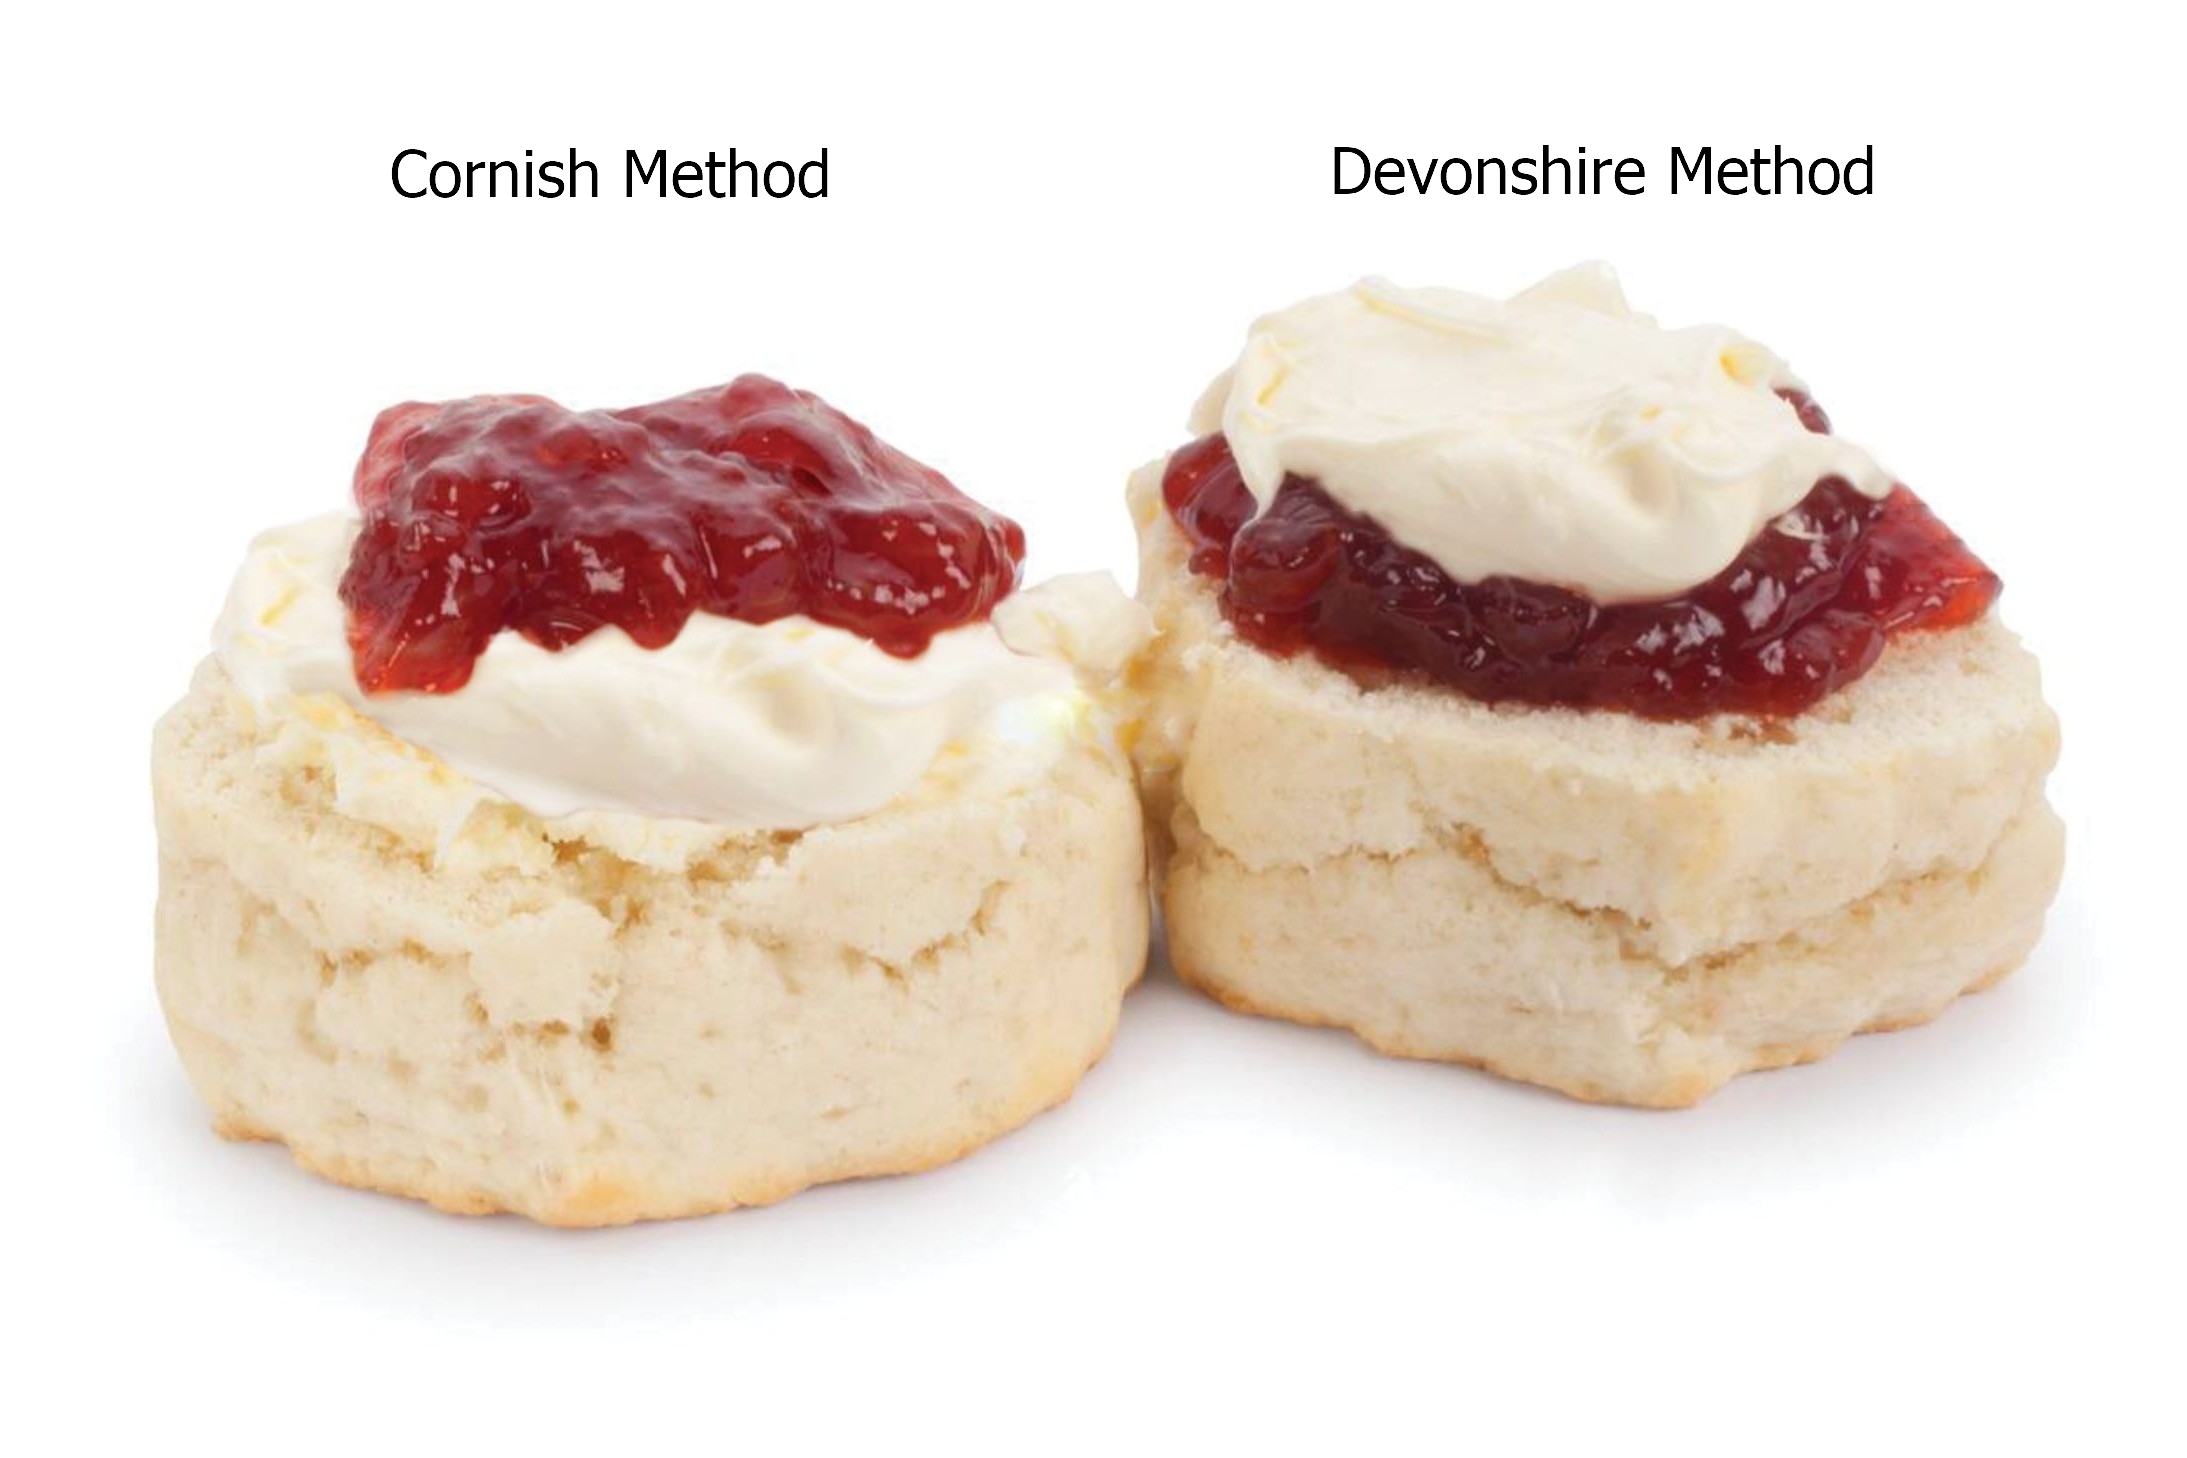
The only acceptable accompaniment to a truly great scone is good-quality jam (usually strawberry) and clotted cream. The Great Scone Debate centers on the order of layering:
- Cornish Method:Jam first, then clotted cream on top.
- Devonshire Method: Clotted cream first, then jam on top.
As a Scottish baker, I adhere to the Devonshire Method: a generous layer of clotted cream, followed by jam. It provides a more stable base and allows the jam's flavor to shine.
How To Store Scones (The Freezer Method)
Scones are best eaten fresh and warm. If you must store them, they will keep for 2 days at room temperature in an airtight container. For the best freshness, freeze the scones aftercutting them but beforebaking.
Place them on a lined tray until solid, then transfer to a bag. When ready to bake, place them directly from the freezer onto a baking tray and add 5 minutes to the baking time.
Frequently Asked Questions
How Do You Make Easy Scones?
Use a simple lemonade or 4-ingredient recipe, which relies on self-raising flour and cream to reduce the number of steps and simplify the technique.
Is A Scone A Cake Or A Biscuit?
A scone is a quick bread, not a cake; it is most closely related to a biscuit but typically contains eggs and is richer in fat and sugar.
What Is The Secret To Making Good Scones?
The secret is to use very cold butter, handle the dough minimally, and avoid twisting the cutter to ensure a straight, tall rise.
What Does A Scone Taste Like?
A scone tastes mildly sweet or savory, has a slightly crumbly but moist interior, and often features a crisp exterior from the high heat bake.
Are Scones Hard Or Soft?
A perfectly baked scone should be soft and light on the inside with a gently crisp crust, not hard or tough.
What Is The Difference Between A Scone And Crumpet?
Scones are baked, quick breads made with a raising agent; crumpets are griddled, yeasted breads with a porous, spongy texture.
Do I Need Lemon Juice For This Recipe?
Only if you are using milk and need to make a substitute for buttermilk, as the acid activates the raising agent for a better rise.
Are Scones Quick To Make?
Yes, scones are known as quick breads; the preparation is typically under 15 minutes, followed by a short 12–15 minute bake.
Final Words
The mastery of scones doesn't come from a complex recipe; it comes from discipline in technique. The commitment to cold ingredients and minimal handling will overcome any challenges you've faced before. Apply this system faithfully, and you will unlock the joy of serving perfect, light, and tender scones-a true centerpiece for any afternoon tea.
Also Check Out: Why Potato Scones Are The Best | A Scottish Culinary Masterpiece
Jump to
Stop Baking Flat Scones: Expert Secrets For A Perfect Texture
What Are Scones?
Best Scone Recipe Ingredients
Master Classic Scone Recipe
The Perfect Scone Technique
Expert Troubleshooting: Common Scone Problems Solved
Best Scone Recipes: Popular Scone Variations & Styles
Serving & Storage: The Perfect Accompaniments
Frequently Asked Questions
Final Words

Callum Fraser
Author
Callum Fraser isn't just a writer about Scotland; he's a product of its rugged landscape and rich history. Born and raised in Perthshire, with the Highlands as his backyard, his love for the nation's stories was kindled by local storytellers and long walks through ancient glens.
This passion led him to pursue a degree in Scottish History from the University of Edinburgh. For over 15 years, Callum has dedicated himself to exploring and documenting his homeland, fusing his academic knowledge with essential, on-the-ground experience gained from charting road trips through the Cairngorms, hiking the misty Cuillins of Skye, and uncovering the secrets of traditional recipes in his family's kitchen.
As the Editor-in-Chief and Lead Author for Scotland's Enchanting Kingdom, Callum's mission is simple: to be your most trusted guide. He combines meticulous research with a storyteller's heart to help you discover the authentic magic of Scotland — from its best-kept travel secrets to its most cherished traditional recipes.
Latest Articles
Popular Articles